In order to better serve our clients, we have decided to implement a procedure that will enable everyone access to the most current signed/sealed drawings available on any given project. This is very important to have if a contractor calls and wants clarification on something. We all need to be looking at the same data. This data is currently stored on the Printing Dept. local hard drive.
The procedure outlined below should be taken after each and every formal submittal of drawings. This includes but is not limited to:
- Building Permit Submittals
- Code Comments
- Revisions
- Owner changes
Software Needed:
- Windows Explorer
- Adobe Acrobat, not Reader
Procedure:
Open Adobe Acrobat.
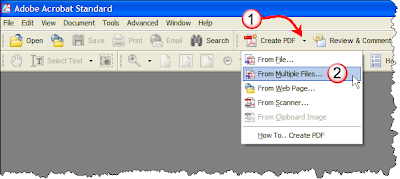
- Click the arrow on the "Create PDF" button.
- Choose "From Multiple Files" option.
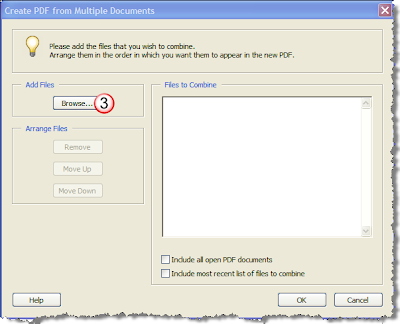
3. Click the Browse... button.
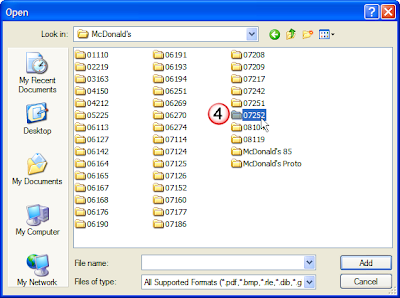
4. Browse to the N:\ drive. This is where the Print Dept has saved all the scanned sealed/signed drawings. Find the correct project folder . The folders are setup by client first then by job number.
5. Next you need see if the tiff files are in the correct order. You can determine this by previewing the first .tiff file named 72520000 where 07252 is the project number. If this is the cover sheet proceed to step 7. If it's not the cover sheet see step 6.
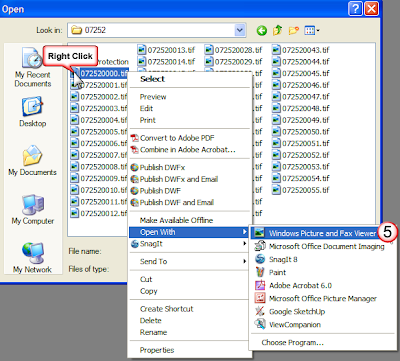
6. If it is the not the cover sheet you will need to reverse the sheet order. To get the sheets in the reverse order right click in the white part of the window and select Arrange Icons By-Name.
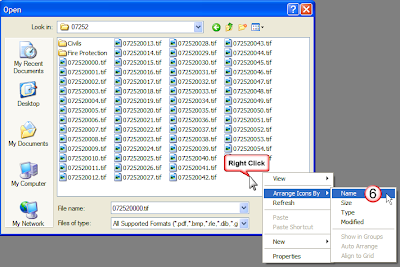
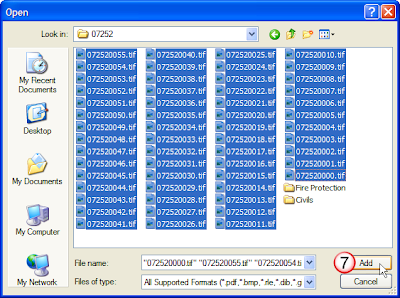
7. With the sheets in order, highlight all the .tiff files and select Add.
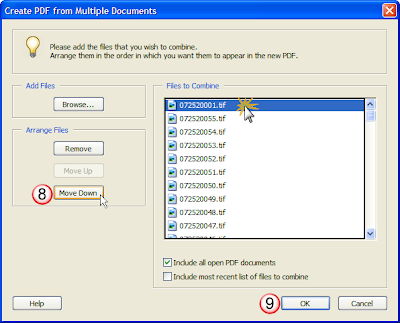
8. Now with files loaded into Adobe you will notice that the first sheet is out of order. Select it and move it to the bottom of the list using the Move Down button.
9. Click OK to finish.
10. Adobe will process all the tiffs and make one file named Binder1.pdf. You will now have a multiple-page PDF file of the sealed/signed drawings. Review the set to make sure that you have all the sheets listed on the cover sheet and that they are in the correct order.
Tip: I like to use the Page tab on the left side to move sheets around if needed. You can just drag them around to the correct order.
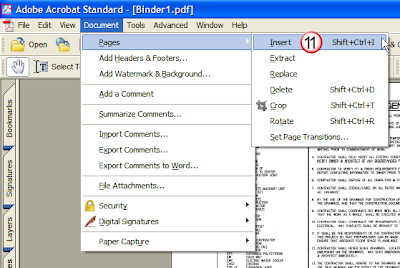
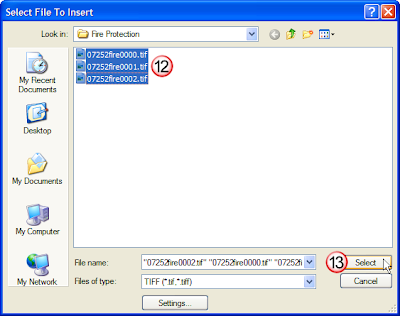
11. You may need to insert additional pages into this file as required. In our example we need to insert the additional fire protection drawings to complete the set. This is done in Adobe by selecting Document from the pull-down menu, then Pages and then selecting Insert.
12. Browse to the additional files needed and highlight them.
13. Click OK.
14. Next choose where you would like the sheets inserted into the set. You can place them before or after any sheet. When you have these set click OK.
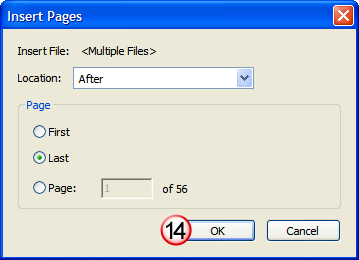
The new sheets will be added to the file. Again you can use the Page Tab on the left side to move sheets around if required.
15. Use the File pull-down and the Save-As... button the save the Binder1.pdf file in the appropriate project directory under the Z:\ drive.
16. If it doesn't already exist create a folder called Record Sets in the project directory by right clicking and selecting New---Folder.

17. Select the Record Sets folder and save the pdf file with a name starting with the date then a short description of the file. For example: 05.23.08_Building Permit Set or 06.11.07_Revision 4 Set.
18. Click Save.
We now have a complete set of what was sent out for that release. It is easily accessed by anyone with or without AutoCAD.
When we revise a set of drawings it will be done in similar manner. Click here to see how to make a revision to a record set.
