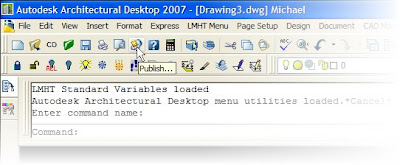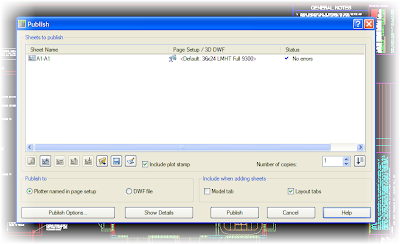
This will bring up the Publish dialog box. This is where you can tell AutoCAD what drawing files you would like to plot and how you want them printed.

I will explain the different section of this dialog box in the following section.
Specifies drawing sheets that you can assemble, reorder, rename, copy, and save for publishing as a multisheet drawing set. You can publish the drawing set to the plotter named in the page setup for hardcopy output or publish to a file such as a plot file or pdf. You can save this list of drawing sheets as a DSD (Drawing Set Descriptions) file. Saved drawing sets can replace or be appended to the current list for republishing.
Sheets to Publish Section
Contains the list of drawing sheets to be included for publishing. Click the page setup to change it. Use the shortcut menu to add sheets or make other changes to the list.
Sheet Name
Combines the drawing name and the layout name with a dash (-). Includes the Model tab only if the Include Model When Adding Sheets option is selected. You can copy sheets by clicking Copy Selected Sheets on the shortcut menu. You can change the name shown in Sheet Name by clicking Rename Sheet on the shortcut menu. Drawing sheet names must be unique within a single PDF file. The shortcut menu also provides an option for removing all the sheets from the list.
Page Setup / 3D DWF
Displays the named page setup for the sheet. You can change the page setup by clicking the page setup name and selecting another page setup from the list. Only Model tab page setups can be applied to Model tab sheets, and only paper space page setups can be applied to paper space layouts. Select Import to import page setups from another DWG file through the Import Page Setups for Publishing dialog box (a standard file selection dialog box).
Status
Displays the status of the sheet when it is loaded to the list of sheets.
Preview Button
Displays the drawing as it will appear when plotted on paper by executing the PREVIEW command. To exit the print preview and return to the Publish dialog box, press ESC, press ENTER, or right-click and then click Exit on the shortcut menu.
Add Sheets Button
Displays the Select Drawings dialog box, in which you can select drawings to add to the list of drawing sheets. The layout names from those files are extracted, and one sheet is added to the list of drawing sheets for each layout and model.
The initial drawing sheet names are constructed from the base drawing name and the layout name or the word Model separated by a dash (-).
Remove Sheets Button
Deletes the selected drawing sheets from the list of sheets.
Move Sheet Up Button
Moves the selected drawing sheets up one position in the list.
Move Sheet Down Button
Moves the selected drawing sheets down one position in the list.
Load Sheet List Button
Displays the Load Sheet List dialog box, in which you can select a DSD file to load. Displays the Replace or Append dialog box if a list of drawing sheets is present in the Publish Drawing Sheets dialog box. You can either replace the existing list of drawing sheets with the new sheets or append the new sheets to the current list.
Save Sheet List Button
Displays the Save List As dialog box, in which you can save the current list of drawings as a DSD file. DSD files are used to describe lists of drawing files and selected lists of layouts within those drawing files. These are helpful if you have a complex print setup.
Plot Stamp Settings Button
Displays the Plot Stamp dialog box, in which you can specify the information, such as drawing name and plot scale, that you want applied to the plot stamp. This is preset from the LMHT custom programs. Please do not adjust these setting.
Include Plot Stamp
Places a plot stamp on a specified corner of each drawing and logs it to a file. Please make sure this is checked. It will help us track plots.
Number of Copies
Specifies the number of copies to publish. If a sheet's page setup specifies to plot to file or PDF, then the number set in this option is ignored and a single plot file is created.
Send the Sheets to the Plotter in Reverse Order Button
When selected, sends sheets to the plotter in reverse of default order. This option is available only if the Plotter Named in Page Setup option is selected.
Publish To Section
Defines how to publish the list of sheets. You can publish to either a multisheet DWF file (an electronic drawing set) or to the plotter specified in the page setup (a paper drawing set or a set of plot files).
Plotter Named in Page Setup
Indicates that the output devices given for each drawing sheet in the page setup will be used. We always use this option except in very rare cases.
DWF file
Indicates that the list of sheets will be published as a DWF file.
Include When Adding Sheets Section
Specifies whether the model and layouts contained in a drawing are added to the sheet list when you add sheets. At least one option must be selected.
Model Tab
Specifies whether the model is included when drawing sheets are added.
Layout Tabs
Specifies whether all layouts are included when drawing sheets are added.
Publish Options Button
Opens the Publish Options dialog box, in which you can specify options for publishing. This is only used if you are publishing to a file like a PDF or plot file.
Show Details
Displays and hides the Selected Sheet Information and Selected Page Setup Information areas.
Selected Sheet Information section
Displays the following information about the selected sheet: source drawing, drawing location, and layout name.
Selected Page Setup Information section
Displays the following information about the selected page setup: plot device, plot size, plot scale, and details.
Publish Button
Begins the publishing operation. Creates one or more plots to a device or file, depending on the options setup in the Publish To area and the options selected in the Publish Options dialog box.
