Frequently asked questions
"How do I replace one block with another block?
CAD Manager: Replacing blocks is useful for 3 reasons:
- To create multiple versions of a drawing, each with a different block. For example, you could try out a floor plan with different dining tables
- When your company replaces one block with a newer version.
- If your drawing is very complex, to reduce regeneration time, by replacing a complex block with a simpler one. Of course, before plotting, you would reverse the replacement.
Method I
Use Express Tools BLOCKREPLACE. This Express Tool lets you replace one block with another globally in a drawing. Follow these steps:
- Make sure that the new block you want to insert is defined in the drawing. (If necessary, insert it to check.)Choose Express> Blocks> Replace Block with Another Block or enter blockreplace on the command line.
- In the BLOCKREPLACE dialog box, choose the block that you want to replace from the list of blocks in the drawing.
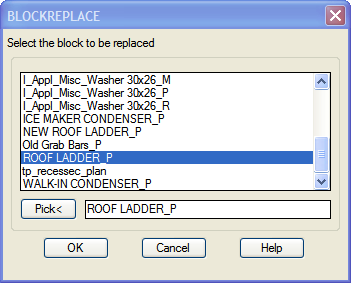
- Click OK.
- Still in the dialog box, choose the block that you want to use to replace the original block.
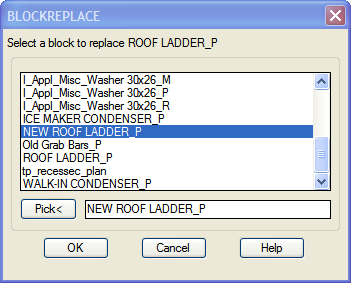
- Click OK.
- At the Purge unreferenced items when finished?
: prompt, enter y or n. You see a me ssage, n blocks replaced. Results may not be apparent until next regen. If necessary, do a regen. (In my test, I didn't need to rege nerate the drawing to see the new block.)
Type -insert on the command line. At the Enter block name or [?] prompt, enter blockname=filename, where blockname is the name of the block in your drawing and filename is the name of the file containing the block you want to use. If the file is not in the support file search path, type the entire path. (You don't need to add .dwg.) Press Enter. For example:
At the Block "ROOF LADDER_P" already exists. Redefine it? [Yes/No] : prompt, enter y and press Enter. You will see the message: Block "ROOF LADDER_P" redefined (with your block name inserted ). At the Specify insertion point or [Basepoint/Scale/X/Y/Z/Rotate]: prompt, press Esc to not insert a copy of the new file; all you want to do is redefine the old block.
Drafting
First if all. DO NOT EVER OVERWRITE DIMENSIONS.
The reasons not to are too many to discuss here. Just don't do it.
"So how do I get the dimension to say what I
You can set the precision of a dimension by selecting it, right clicking then picking Precision from the pop up menu. See image below
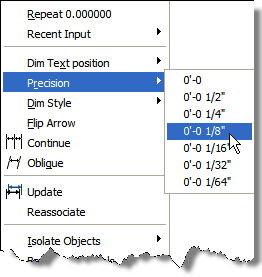
You can also change this setting in the properties palette after selecting the dimension(s).
Continuing with the dimension theme this week. I will show you two tricks I use when dealing with dimensions. First how to quickly add notes to your dimension strings. Second how to deal with those dimensions in tight places.
Quickly Add Notes to Dimensions
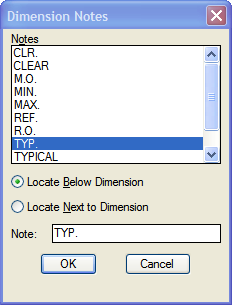 At the command prompt type DNOTE or DN. This will display the Dimension Notes dialog box shown below.
Click OK.
Lastly choose the dimension to attach your note to it.
You can attach multiple notes to one dimension, it will place each note under the last note.
This tool is great because if the dimension is stretched or moved the text will move with it.
Working with dimensions in small places.
If you have a dimension similar to what is shown below.
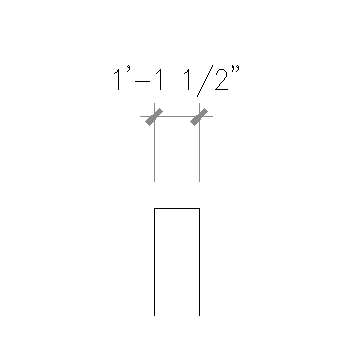
 At the command prompt DA.
AutoCAD will ask you to select a dimension to be relocated.
Select the dimension text.
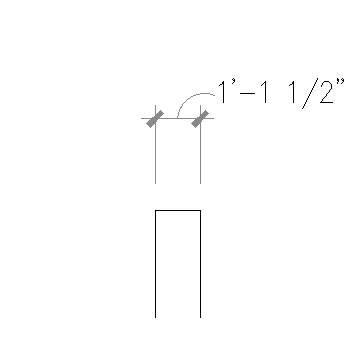
Move the text to the side, An arc will be drawn from the center of the dimension line to the text.
You will end up with a dimension like this. Afterwards if you need to move the dimension text again just use the DA command again and reposition the text. The arc will be erased and a new one will be drawn.
Bonus tip: It a dimension text has been move from home use the HT command to return the text to home. (centered between the extension lines.
See you all next week and keep the questions/comments coming.
Thanks
